
Disclaimer: As an affiliate I may earn a commission on any qualifying purchases, including those from Amazon.com, at no extra cost to you – read more.
Sleeping under the stars in your hammock during summer is one thing, but when it comes to the winter months, things can start to get quite chilly. So, how do you stay warm when camping in a hammock?
The two most important pieces of gear you need to stay warm in a hammock are a top quilt and an underquilt. However, other factors can keep you warm such as setting up near natural windbreakers, layering up, and using a hot water bottle.
Keep reading for more information on each of these tips and some of my recommended hammock camping gear for heading out in the winter weather.
- How Cold is Too Cold for Hammock Camping?
- Tips to Stay Warm in a Hammock
- 1. Set Up Near Natural Wind Breakers
- 2. Use a Tarp to Reduce Wind and Rain
- 3. Use an Underquilt
- 4. Try a Sleeping Pad as an Underquilt Alternative
- 5. Use a Top Quilt
- 6. Try a Sleeping Bag as a Top Quilt Alternative
- 7. Consider a Sleeping Bag Pod
- 8. Bring a Pillow
- 9. Layer Up
- 10. Make a Hot Water Bottle
- 11. Bring Heat Pads
- Related Questions
How Cold is Too Cold for Hammock Camping?
You can go hammock camping without any specialist gear in temperatures down to 70°F (21°C). if you have insulation such as a top quilt or underquilt, you can camp in temperatures as low as 20°F (-6.6°C). However, anything below 40°F (4.4°C) requires above-average equipment and lots of experience because it will be very chilly.
These temperatures I have stated refer to the lowest temperature which likely occurs late at night or early in the morning. You should check the temperature rating of your gear as not all insulation can withstand the same temperatures.
Tips to Stay Warm in a Hammock
1. Set Up Near Natural Wind Breakers
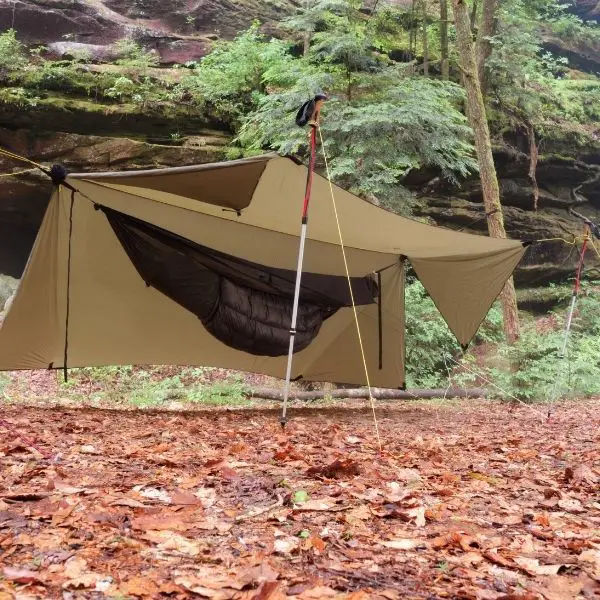
Before you even get set up, consider your location. Try to place your hammock near natural windbreakers such as thick trees, large bushes, or even large rocks such as in the image shown here.
If you set up your hammock in the middle of a large open field, you’ll experience much windier conditions than you would in the middle of a forest.
2. Use a Tarp to Reduce Wind and Rain
Aside from natural windbreakers, you can use your hammock tarp as a windbreaker too.
Most people associate tarps with protection from rain, but if you position it well, the sides can keep you protected from the wind and provide some insulation too.
When setting up your tarp to protect from wind, ensure you keep the tarp as low as possible to the hammock whilst still allowing you to get in and out easily. Then, angle the sides steeply to provide as much sideways protection.
Recommend Tarps: ENO ProFly and Gold Armour

My top pick is the ENO ProFly which is a hexagonal shape tarp, offering a good balance between coverage and portability.
It’s highly durable and the 70D nylon fabric works well to protect against wind as well as rain. It’s quick to set up and the ripstop reinforcement means it will last a long time.

If you’re on a budget, the Gold Armour tarp is a great pick. Like the ENO, it’s a hex shape which I would recommend for beginners, however, it’s made from polyester rather than nylon so it’s a little bulkier and heavier in your backpack.
If you’ll be carrying it your gear for long distances, then I’d recommend you spend that little extra for the ENO above or a lightweight tarp such as the Wise Owl asymmetrical tarp.
For more recommendations suited to different occasions, see my full guide to the best hammock tarps.
3. Use an Underquilt
One of the most important pieces of equipment for hammock camping in cold weather is an underquilt.
These hang beneath your hammock to create a layer of air as insulation. This is important in a hammock because the wind chill can cause your back to get very cold at night without any insulation.
When choosing an underquilt, you’ll have the choice between synthetic fillings such as polyester or down (feathers) which are warmer and lighter but more expensive.
Recommended Underquilts: ENO Blaze and OneTigris Hideout

The ENO Blaze is an excellent underquilt for winter due to its high performance and low weight. It uses down filing which is more insulative than synthetic filling, giving the underquilt a 30 – 40°F (-1.1 – 4.4°C) temperature rating, and ENO are known for giving conservative estimates.
The down filling also means the underquilt is lightweight at 18oz so it’s very portable. However, it’s not a cheap product so it’s not great for beginners just dipping their toes in.

If you won’t be camping in the extremes of winter but still need something to keep you warm, the OneTigris Hideout is an affordable hammock underquilt that’s still very functional.
It’s rated for temperatures between 41-68°F (5-20°C) and is best when used from Spring-Fall. Unlike the Blaze, it uses a synthetic filling which means it’s heavier to carry around at 32oz.
4. Try a Sleeping Pad as an Underquilt Alternative
An alternative to an underquilt is a sleeping pad. Unlike an underquilt which hangs below the hammock, a sleeping pad will need to be placed underneath you inside the hammock to provide insulation.
I find these to be more difficult to use than an underquilt as it’s hard to keep them in place and they affect the hang of the hammock. However, they are generally cheaper and more versatile because you can also use them while tent camping, so they are a suitable alternative for those who like to do both.
In the long term, if you’ll be using your hammock in the cold regularly, then it’s better to invest in a good underquilt such as the one mentioned earlier.
5. Use a Top Quilt
Once you’ve got some insulation for your back, it’s time to consider how you’ll keep your front warm. The best option is a top quilt. These are similar to an unzippered sleeping bag.
Like an underquilt, they are available with either a synthetic filling or a more premium down filling. Most will have a foot box to tuck your feet in and keep your toes nice and toasty.
Recommended Top Quilts: ENO Vesta and Onetigris Featherlite

The Vesta offers a good balance between price and performance, with a synthetic filling that’s suitable for temperatures between 30-50°F.
The footbox can be unzippered to turn it into a camp quilt. One of the advantages of this product is that it’s lightweight, weighing just 28oz so you can pack it easily.

The Featherlite top quilt is cheaper than the Vesta but still offers unrivalled quality and is great for beginners. It has a large footbox to keep the heat in.
The polyester filling is suitable down to 40°F although it’s slightly slimmer than other top quilts on the market.
6. Try a Sleeping Bag as a Top Quilt Alternative

Instead of a top quilt, you can also use a regular sleeping bag. These tend to be cheaper than a dedicated top quilt and you probably already have one if you’ve transitioned from tent camping so it’s ideal for beginners.
However, they tend to be heavier to carry around than a top quilt and more awkward to use with a hammock. If you try to use it with the zipper open, they are generally a little large for your typical hammock.
Note: Although your sleeping bag wraps around your entire body, it will not provide adequate insulation for your back because the weight of your body will compress the air, so it’s not an alternative to an underquilt.
7. Consider a Sleeping Bag Pod
So, you don’t want the hassle of carrying both a top quilt and underquilt? Well, there is one option and that’s a sleeping bag pod.
This is not a regular sleeping bag like the one mentioned in the previous tip that you would use inside the hammock, a sleeping bag pod wraps around the outside of the hammock such as the Hyke & Byke pod shown here.
The key difference is that you won’t compress the bottom of the sleeping bag so it provides very effective insulation for your top and bottom.

However, there are some downsides to this method. You’ll end up with holes in the sleeping bag where the hammock pulls through, this can cause a draft so you’ll need to plug the holes with jackets or blankets.
It’s also hard to regulate the temperature because you don’t have the option to adjust the top insulation as you would with a separate top quilt, this will get far too warm in the summer.
Ultimately, I would still recommend a top quilt and underquilt as a tried and tested combination.
8. Bring a Pillow
Whilst you don’t need a pillow in a hammock, using one can provide both comfort and a layer of insulation for your neck and head.
You can opt for a traditional synthetic camping pillow or an inflatable pillow. Some hammockers like to use a travel pillow such as those you’d take on an airplane, however, I find that these are usually too big and create a strange position for your neck.
9. Layer Up
There’s a common myth that it’s warmer to sleep naked in a sleeping bag https://sectionhiker.com/is-it-warmer-to-sleeping-naked-in-sleeping-bag/. This is not true for tent camping nor is it true for hammock camping.
If you want to keep warm in your hammock, it’s best to wrap up with multiple layers rather than one thick layer. Treat the top quilt or other insulation as your outer layer.
For your base layer, opt for lightweight clothing made from light polyester, merino wool or silk as these are quick-drying, odour resistant, and help sweat evaporate quickly.
If you feel like another layer is needed, you can then add a layer of thicker clothing such as pants and a fleece or pullover. Polyester or wool are best because they can retain heat well.
Don’t forget about other parts of the body too. Thick socks, gloves, and even a balaclava can all help keep you warm while hammock camping in the cold.
10. Make a Hot Water Bottle
A hot water bottle is a tried and tested way to keep warm at night and you can use a similar method to stay warm in your hammock too.
You don’t need to carry a proper hot water bottle like you’d use at home (although you can if you wish), but you can make use of other items you have with you.
A common option is to use a hard plastic water bottle. Fill this with water heated over the campfire then place it inside a thick sock to ensure you don’t burn your hands.
Now you can place this inside your hammock before you get in, or snuggle up with it at night. Make sure you are fully satisfied that it doesn’t leak before going ahead with this method.
11. Bring Heat Pads
An alternative to a hot water bottle is to bring heat pads with you. These usually contain iron, carbon and water which react together to create heat for some time. You simply open the pack, shake them and the chemical reaction begins inside the pad.
I recommend these Hot Hands Body Warmers which are larger than most heat pads and very affordable if you buy them in a pack of 40.
The downside is that you’ll have to carry them with you, even after you’ve used them because they’ll need to be put in the bin afterwards. They are single-use too which isn’t great for sustainability. You can also buy reusable heat pads, but a hot water bottle would probably be a better item to carry.
Related Questions
Are Hammocks Colder than Tents?
Yes, hammocks are colder than tents because they are more exposed to wind chill. However, with the correct gear such as underquilts, top quilts, and tarps, you can be just as warm in a hammock as you can in a tent.
Do You Need a Pillow in a Hammock?
No, you don’t need a pillow in a hammock, however, some hammock users still choose to do so for added comfort and to provide additional insulation for their head and neck.
Do You Need a Blanket if You Have an Underquilt?
Yes, you still need a blanket if you have an underquilt. An underquilt hangs below a hammock to provide insulation for your back, you will still need something to keep your front warm such as blanket, top quilt, sleeping bag, or other gear.
